Serving OS via Netboot
This guide covers explanation and implementation of converting an SD card ready OS Image, into a Netboot friendly format.
I’ll be using RaspiOS but the process should be generic enough to cover most Pi compatible OS’s
Explanation
Raspberry Pi OS (formerly known as Raspbian) is the official operating system for Raspberry Pi single-board computers, providing a Debian-based Linux distribution optimized for the Raspberry Pi hardware.
The Raspberry Pi foundation provide downloadable SD card images of their OS. But these images are primarily intended to be written to an SD card (or similar physical media), so we will need to extract the contents into a netboot friendly format.
Components
- Image File
- The Raspios img file is a disk image of the Raspberry Pi OS, encapsulating the entire operating system, bootloader, and file system, ready to be written to an SD card for use with Raspberry Pi single-board computers.
- Bootloader Partition
- The bootloader partition of the image file contains kernel, firmware and configuration information necessary for initializing the Raspberry Pi during the boot process.
- The bootloader partition then tells the Pi where to find the OS partition
- OS Partition
- The OS partition of the image file contains the actual operating system files, including the Linux kernel, system libraries, and user-space applications, organized in a file system structure compatible with the Raspberry Pi hardware.
Implementation
Obtaining the Boot + OS files
Get rid of any surrounding compression, ensure you have the IMG file ready in a working directory.
We need to mount the partitions contained within the image so we can properly extract the contents.
To do this the easy way, you can mount the image with with losetup -Pf <image-file> --show which will automatically figure out partition info of the provided file and create loop devices for each partition
root@ubuntuvm:~$ losetup -Pf ./download/extracted/2023-12-11-raspios-bookworm-arm64-lite.img --show/dev/loop100The command will return the name of the loop device being used, the partitions will be available as p${Index} suffixed devices, which can be mounted like so:
mount /dev/loop100p1 /mnt/tmp-img-bootmount /dev/loop100p2 /mnt/tmp-img-osYou are now able to query their contents:
root@ubuntuvm:~$ ls /mnt/tmp-img-boot/
armstub8-gic.bin     bcm2711-rpi-cm4s.dtb  fixup4.dat    fixup.dat     start4db.elf  start_db.elf     u-boot-rpi4.binbcm2711-rpi-400.dtb  bootcode.bin          fixup4db.dat  fixup_db.dat  start4.elf    start.elfbcm2711-rpi-4-b.dtb  config.txt            fixup4x.dat   fixup_x.dat   start4x.elf   start_x.elfbcm2711-rpi-cm4.dtb  fixup4cd.dat          fixup_cd.dat  start4cd.elf  start_cd.elf  u-boot-rpi3.bin
You’ll maybe have noticed config.txt is in here - these are the files the Pi needs to boot, and is looking for on the TFTP server!
So all we have to do now is copy the contents over to the appropriate locations - to potentially support multiple OS’s/configurations I’ve put my OS files in a relevantly-named subdirectory 2023-12-11-raspios-bookworm-arm64-lite
cp -r /mnt/tmp-img-os/* ./src/bootstrap/netboot/os/2023-12-11-raspios-bookworm-arm64-litecp -r /mnt/tmp-img-boot/* ./src/bootstrap/netboot/boot🥳 We now have the files we need! However we’re not done yet.
Modifying the Bootloader & OS to use NFS
Since we’ve ripped these files directly from an SD card image, they are likely still configured to look for the OS files on a partition of the SD card.
We need to update cmdline.txt in the boot directory to tell the bootloader to look for the OS files on an NFS share, as opposed to the SD card
./src/bootstrap/netboot/boot/cmdline.txt
selinux=0 dwc_otg.lpm_enable=0 console=tty1 rootwait rw nfsroot=192.168.0.108:/mnt/nfsshare/2023-12-11-raspios-bookworm-arm64-lite,v3 ip=dhcp root=/dev/nfs elevator=deadline systemd.log_level=info systemd.log_target=console systemd.debug-shell=1Additionally the OS partition still has some fstab entries for the SD card, they need updated to look on the NFS share as well:
./src/bootstrap/netboot/os/2023-12-11-raspios-bookworm-arm64-lite/etc/fstab
proc /proc proc defaults 0 0192.168.0.108:/mnt/nfsshare/2023-12-11-raspios-bookworm-arm64-lite/boot/firmware /boot/firmware nfs defaults 0 2192.168.0.108:/mnt/nfsshare/2023-12-11-raspios-bookworm-arm64-lite / nfs defaults,noatime 0 1Unattended Installation
The steps outlined above will bring you to the goal described here, the OS will boot. However since the OS is being booted for the first time, you will likely be dropped into a setup wizard.
Approach
To avoid this, make use of unattended setup. There are a few ways to do this:
- Change the default init argument in
cmdline.txtto run a shell script before systemd- running before systemd means you may be missing access to stuff you might need
- Leverage systemd in
cmdline.txtto create a custom boot script, similar to what rpi-imager offers- this requires re-patching
cmdline.txtafterwards in order to boot the system normally
- this requires re-patching
- Provide a
userconf.txtfile in the boot directory, with a username and password- this only automates login credentials
- Use a tool like SDM to create a prepared custom IMG file
- no complaints on this one, just not a good fit for right now
I’ll be utilizing the first option here, by injecting a shell script into the boot process that then executes systemd as typically intended.
Implementation
The shell script (named apply-config.sh here), is a highly modified version of the firstrun.sh file created by the Raspberry Pi Imager and is added to the OS partitions boot directory alongside a .config file, which is used to provide configuration values to the script - An example file is here
I’ve made modifications to this script to do the following:
- Check if a
/boot/.configfile exists - Action the configuration(s) specified
- Remove
/boot/.configto prevent reconfiguration
So now all that is left is to copy the script and config file to to the OS boot directory:
cp -v -r ./src/bootstrap/netboot/assets/* ./src/bootstrap/netboot/os/2023-12-11-raspios-bookworm-arm64-lite/And add init execution to cmdline.txt:
echo " init=/boot/apply-config.sh" >> /mnt/tmp-img-boot/cmdline.txtOur final cmdline.txt looks like this at the moment:
selinux=0 dwc_otg.lpm_enable=0 console=tty1 rootwait rw nfsroot=192.168.0.108:/mnt/nfsshare/2023-12-11-raspios-bookworm-arm64-lite,v3 ip=dhcp root=/dev/nfs elevator=deadline systemd.log_level=info systemd.log_target=console systemd.debug-shell=1 init=/boot/apply-config.shAutomation
No, you don’t need to do it very often. Yes, this process is tedious. No it doesn’t actually take much time/effort. Yes, I automated it anyway ⚡
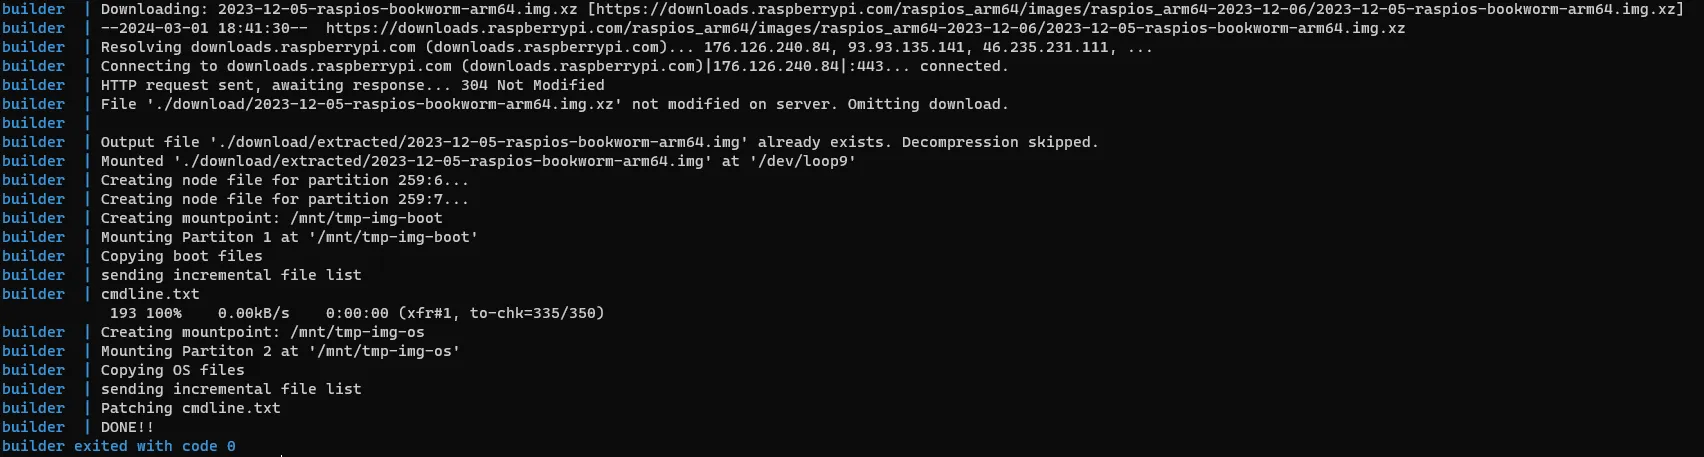
Within the pi-k3s-gitops repo, I’ve created a ‘builder’ Dockerfile, as well as a Bash script called build-image.sh that tries to do all this automatically.
When I run docker compose up the builder is fired up. It will then download the image, extract it, mount and copy the files, patch cmdline.txt in the boot files and finally /etc/fstab in the OS files
This has been very helpful for me in identifying the actual steps needed to do any of this, and a great help in updating my stored images, debugging or even just starting over from scratch.
Next Steps
We should now have a fully working netboot Pi with SSH ready to go. Let’s see it in action :)